The Sound window
 A sound window displays a mono or stereo sound record in MSWindows 'wav' format. To see the information contained in the wav file header type <Ctrl> D. A new spreadsheet with the header data will appear. The sound window shows two red vertical markers delimiting the action window. To move a marker, push the left mouse button when the
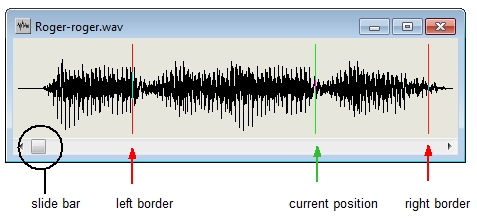
  cursor appears and drag the marker while keeping the mouse button depressed. The green line can't be moved. It indicates the current position in the file while playing the record. The position of the markers (in sample numbers) is shown in the sound tool window edit box
![]() V-amp, vertical amplification. Use the slide bar
V-amp, vertical amplification. Use the slide bar![]() to change amplification.
to change amplification.
![]() H-res, use this slide bar
H-res, use this slide bar![]() to set the horizontal resolution in data-points per screen pixel (pp). The maximum resolution is 1 pp. The minimum resolution depends on file size and the current window width.
to set the horizontal resolution in data-points per screen pixel (pp). The maximum resolution is 1 pp. The minimum resolution depends on file size and the current window width.
![]() Play all. Plays the entire record, irrespective of the settings of the action window.
Play all. Plays the entire record, irrespective of the settings of the action window.
![]() Play selection. Plays the section of the record within the action window.
Play selection. Plays the section of the record within the action window.
![]() Stop button.
Stop button.
![]() Pause button, If paused, the button changes colour
Pause button, If paused, the button changes colour ![]() .
.
![]() Record button. Create a new ".wav" file. After pushing this button, a dialogue window comes up asking for the number of channels (mono or stereo) and the sample frequency. To stop recording, push the stop button. It is possible to play and record from multiple sound windows simultaneously (although this will probably not improve quality). For synchronous recording and playing from the same sound window see Synchronous rec/play from the Create menu.
Record button. Create a new ".wav" file. After pushing this button, a dialogue window comes up asking for the number of channels (mono or stereo) and the sample frequency. To stop recording, push the stop button. It is possible to play and record from multiple sound windows simultaneously (although this will probably not improve quality). For synchronous recording and playing from the same sound window see Synchronous rec/play from the Create menu.
![]() Loop button. Depending on whether the 'play section' or the 'play all' button is pushed, the selected section or the entire record will be played repetitively.
Loop button. Depending on whether the 'play section' or the 'play all' button is pushed, the selected section or the entire record will be played repetitively.
![]() Convolve. If sound templatesIn this document the words 'sound template', 'impulse response' and 'transfer function', if used in the context of audio data, refer to the same thing, i.e. an array of floating point numbers having a length of a power of 2 (preferably 8192) that is used to convolve audio data prior to sending it to the sound card. for the left and, in case of a stereo record, the right audio channel have been defined and set, the wav file will be convolved with the templates while playing.
The convolve checkbox may be switched on and off while playing provided that the record has been started with convolve checked.
Convolve. If sound templatesIn this document the words 'sound template', 'impulse response' and 'transfer function', if used in the context of audio data, refer to the same thing, i.e. an array of floating point numbers having a length of a power of 2 (preferably 8192) that is used to convolve audio data prior to sending it to the sound card. for the left and, in case of a stereo record, the right audio channel have been defined and set, the wav file will be convolved with the templates while playing.
The convolve checkbox may be switched on and off while playing provided that the record has been started with convolve checked.
The convolution may amplify the signal such that it exceeds the dynamic range of the sound card. If that happens, the level meter in the middle of the sound tool flashes red to indicate clipping at the output.
The Create menu
Synchronous rec/play.After selecting this menu item, the stretch of sound within the action window starts playing, while at the same time new data is sampled from the sound card. Upon termination of the stretch of sound or after pushing the stop button in the sound tool window, a 'save file' dialogue window pops up. Enter a filename for the new data. The file format will be the same as the current file. Hence, if the original is 16 bit stereo 44 KHz, the new file will be also 16 bit stereo 44 KHz.
Convolve and save.
The current 'wav' file is read, convolved and written to disk under a new filename. This menu option is available after having created and set sound template(s) for the left (and right) audio channels. With the option As is, Sounds does not check for clipping. With Prevent clipping, the amplitude of the convolved signal is scaled down if this is necessary to prevent clipping. With Maximise resolution, the convolved signal is scaled in order to use the entire dynamical range of the wav format (i.e. 8 or 16 bit integer). Because the latter two options may take twice the time as As is, it saves time to scale the convolution template(s), using the spreadsheet Sound>Edit sound template menu item when convolving large files.
Spectrum.
Create a frequency spectrum using the data within the action window.
Density histogram.
Create a probability-density histogram using the data specified by the action window.
Cross correlation.
Create the cross correlogram between two sound records. The records may be the left and right channel in the same sound window or the records in different windows. In the "cross correlation" dialogue box that pops up, select the two records to correlate (record-1 and record-2). If record 1 & 2 are identical, the auto correlogram will be obtained. Only data contained within the action window(s) will be used. If the action windows are of unequal length, the shorter will be assumed and the longer action window will be readjusted and redrawn. If the "new document + spectra" option is chosen, then the routine will return, besides the cross correlogram, the amplitude spectrum and, unless auto correlation is carried out, the phase spectrum.
The Edit menu
UndoUndoes the previous action, restores the data.
Copy With Edit>Copy a small stretch of sound samples can be copied to the spreadsheet or to the drawing sheet. Because the spreadsheet column length is limited to 65530, the number of samples copied may not exceed 65530. If you have selected a stretch (using the vertical red lines delimiting the action window) that contains more than 65530 samples, a dialogue window will pop up requesting whether you would like to reduce the number of samples either by truncation or by under-sampling. Copy can not be used to copy and paste sound tracks from one sound window to another.
Transpose.
Change pitch of the sound record by changing the sample frequency entry (should be <50KHz).
Volume.
In the dialogue box that pops up, the amplification (in % of the actual signal strength) for the left and, if present, the right audio channel can be set. After pushing the OK button, the data within the action window will be scaled and ,depending on the data format, clipped to 8 or 16 bit.
Fade in/out.
The left and right channel audio data in the action window will be multiplied by a linear function going from 0 to 1 for Fade In and from 1 to 0 for Fade Out.
Save prefs.
Save this window's preferences (its size and the position of the action window).
Search the manual: